
VIP member

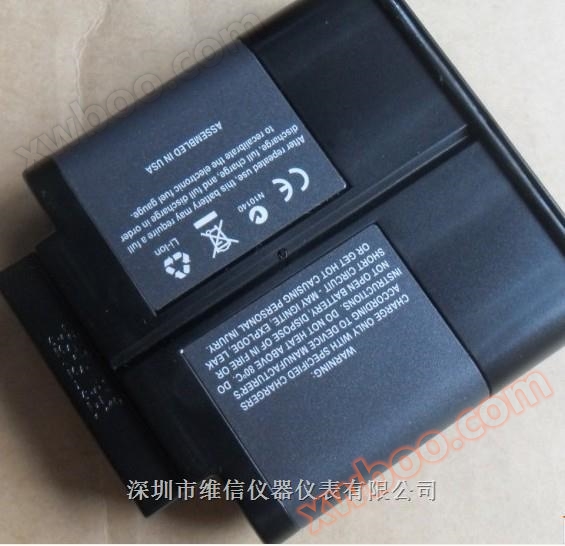
FLUKE Ti50 series rechargeable battery
FLUKE Ti50 series rechargeable battery
Product details
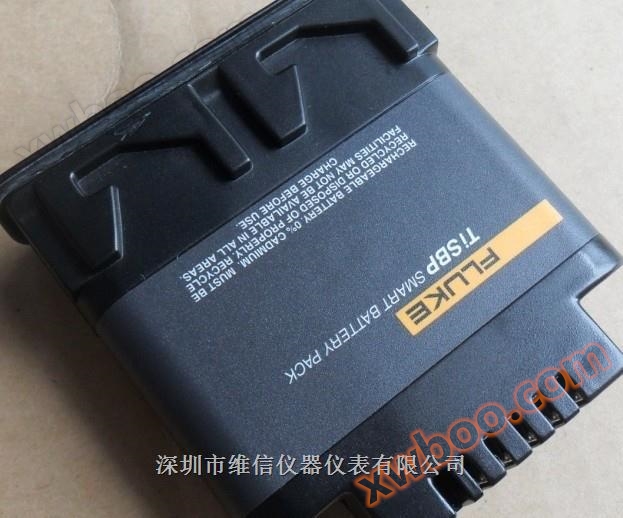
Brand New OriginalFLUKE-TiSBP SMART BATTERY PACK 7.4V
FLUKE-TiR2, TiR3, TiR4, Ti40, Ti45, Ti50, Ti55 IR FlexCam Thermal Imagers rechargeable 7-volt lithium-ion battery
Fluke TI50 series rechargeable battery
Fluke FLUKE Ti40 Ti45 Ti50 TI55 Infrared Thermal Imager Infrared Thermal Imager Two Rechargeable Batteries
Battery type: rechargeable lithium-ion smart battery, field replaceable
Battery operation
time
Continuous use for 3 hours
Charging and inserting the battery
Charge the battery for 3 hours before use. Be sure to use the provided rechargeable battery. When the charger
When the green LED indicator light on the top continues to light up, it indicates that the charging is complete.
Pay attention to FLUKE Ti50 series rechargeable batteries
You can use an auxiliary AC power supply to connect the thermal imager to a live AC socket
Charge at least one battery.
eii002.eps
Figure 1-2 Insert battery FLUKE Ti45 Ti SBP infrared thermal imager rechargeable lithium-ion intelligent battery TISBP brand new
View thermal imager and battery information
The "Information" tab in the "Thermal Camera Information" window contains a list of main functions, for example
Such as infrared refresh rate, infrared image size (in pixels), zoom function
IR-Fusion ® (Infrared fusion) function, serial number of thermal imager, software version, and each one used
Description of the lens (if more than one), calibration range, number of images on the memory card, and storage
The size of used and available space on the card.
To view information on the "Information" tab:
1. Click on F.
2. Use the mouse controller to place the pointer on "Thermal Camera Information" in the pop-up menu and click on it
E。
3. Place the pointer on the "Information" tab and click E.
4. Place the pointer on the up and down arrows and scroll to view more detailed information.
5. Click the "Trigger" button to return to the scanning target mode.
Thermal imager maintenanceCHARGE A BATTERY
The thermal imager you are using comes with a battery charger suitable for 100 to 240 V AC input power
Pressure, input frequency of 50 or 60 Hz. The charger has a recalibration function to maintain the correct capacity
Quantity monitoring effect. When powered by a battery, the battery symbol appears on the taskbar of the thermal imager display screen
On the right side. The indication of remaining power is shown in Table 8-1.
Table 8-1 Remaining battery level indicator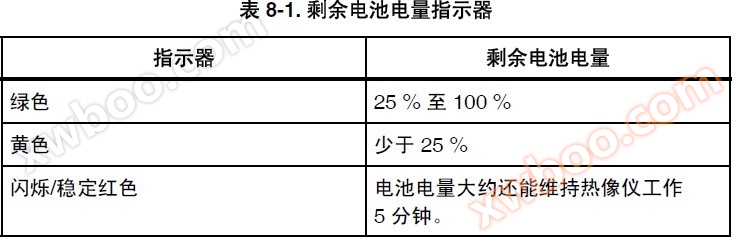
Indicator remaining battery level
Green 25% to 100%
Yellow less than 25%
The flashing/stable red battery level can still maintain the operation of the thermal imager
5 minutes.
Use the mouse controller to place the pointer on the battery icon. Press E to get the remaining battery power
Estimate the operating time of the thermal imager.
TiR2,TiR3,TiR4,Ti40,Ti45,Ti50,Ti55
user's manual
8-4
To charge the thermal imager battery:
pay attention to
Before use, charge the battery for at least 3 hours. Charge the two batteries in sequence. In the
Before a battery completes charging, it remains in standby mode.
1. Connect the battery charger to an AC power outlet. Outside of the United States, sockets may be required
Adapter.
2. Connect the power supply to the dual battery charger.
3. Insert a battery into one of the battery charger sockets; If * * a battery (if
Insert it into * * charger sockets.
The LED indicator light in front of each charging dock indicates the charging status, as shown in Table 8-2.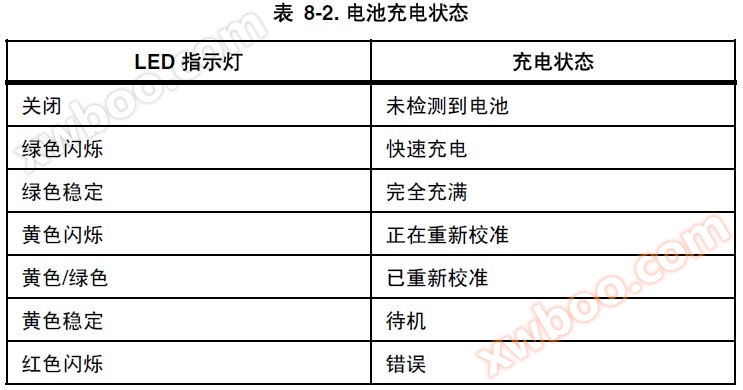
Table 8-2 state of charge
LED indicator light charging status
Close undetected battery
Green flashing fast charging
Green, stable, fully filled
Yellow flashing is recalibrating
Yellow/green recalibrated
Yellow stable standby
Red flashing error
Recalibrate the battery
The thermal imager battery should be recalibrated regularly to maintain the accuracy of battery measurement. If the battery needs
Re calibrate, when you turn on the thermal imager, a warning pop-up window will appear on the thermal imager display screen
Mouth.
Thermal imager maintenance
Save battery power by 8
8-5
pay attention to
Re calibration may take up to 16 hours. You can give one on the charging dock on the right
Charge the battery while recalibrating another battery on the left charging dock.
importantRecalibrate the battery:
1. Insert the battery into the left charging dock of the battery charger.
2. Press the recalibration button on the front of the charger.
Save battery power
In order to save battery power (when the thermal imager is powered by batteries instead of AC power), when the system
After 5 minutes of idle time (which can be changed), the display screen will automatically turn off and the system will switch to
Standby mode. When the system is in standby mode for 10 minutes (this time can be changed), the thermal imager will
Turn off the machine. You can also manually switch to standby mode.
To manually switch from full power to standby mode, click D once. D is flashing green.
To switch from standby mode to full power, click D again. Maintain a stable green color.
To turn on or off, press and hold D for 4 seconds. When turned on, D remains stable green; equal
When turned off, there is no indicator light indicating.
To change the standby timeout:
1. Click on F.
2. Use the mouse controller to place the pointer on "Thermal Camera Settings" in the pop-up menu.
3. Click on E.
4. Place the pointer on the "Power" tab and click E.
5. Place the pointer on the "standby timeout" arrow and press E.
6. Place the pointer at the desired time and press E.
7. Click the "Trigger" button to accept the setting changes and return to the scanning target mode.
Viewing Camera and Battery Information
The Info tab within the Camera Info window contains a list of key features
such as IR refresh rate, IR image size (in pixels), zoom capabilities, IRFusion
® capabilities, camera serial number, software versions, lens
descriptions of each lens used (if more than one), calibration range, number of
image files on the memory card, and the used and free space on the memory
card.
To view the Info tab information:
1. Tap F.
2. Use the mouse controller to position the pointer over Camera Info on the
popup menu and tap E.
3. Position the pointer over the Info tab and tap E.
4. Position the pointer over the up/down arrows to scroll and see additional
details.
5. Tap to return to scan target mode.
Camera Care
Charging the Batteries 8
8-3
The Battery tab within the Camera Info window shows the power source,
remaining battery charge level, and battery manufacturer, serial number, and
number of discharge cycles.
To view the Battery tab information:
1. Tap F.
2. Use the mouse controller to position the pointer over Camera Info on the
popup menu and tap E.
3. Position the pointer over the Battery tab and tap E.
4. Tap to return to scan target mode.
Charging the Batteries
Your Camera comes with a battery charger that works with 100 to 240 V AC
input voltage and 50 or 60 Hz input frequency. The charger has a recalibration
feature to maintain correct capacity monitoring. When using battery power, a
battery symbol appears in the far right side of the camera display screen task
bar. The remaining charge capacity is indicated as shown in Table 8-1.
Table 8-1. Remaining Battery Charge Indicators
Indicator Battery Power Remaining
Green 25% to 100%
Yellow Less than 25%
Flashing/Solid Red Approximately 5 minutes until camera
powers off.
Use the mouse controller to position the pointer over the battery icon. Press
E to obtain an estimate of the remaining battery charge and camera runtime.
TiR2,TiR3,TiR4,Ti40,Ti45,Ti50,Ti55
Users Manual
8-4
To charge camera batteries:
Note
Charge at least one battery for 3 hours before use. Two batteries
charge sequentially. The second battery remains in standby mode
until the first battery is charged.
1. Connect battery charger AC power supply to a power outlet. An outlet
adapter may be necessary outside of the United States.
2. Connect the power supply to the dual-bay battery charger.
3. Insert one battery into one of the battery charger bays; insert the second
battery—if available—into the second charger bay.
The LED indicator in front of each bay indicates the charging status as shown
in Table 8-2.
Table 8-2. Battery Charging Status
LED Indicator Charging Status
Off No battery detected
Green Flashing Fast charging
Green Solid Fully charged
Yellow Flashing Recalibrating
Yellow/Green Recalibrated
Yellow Solid Standby
Red Flashing Error
Recalibrating the Batteries
You should recalibrate your camera batteries periodically to maintain the
accuracy of the battery gauge. If a battery requires recalibration, a warning
popup window appears on the camera display screen when you power on your
camera.
Fluke TI50 series rechargeable battery
Brand New OriginalFLUKE-TiSBP SMART BATTERY PACK 7.4V
Online inquiry
-
Contacts
-
Company
-
Telephone
-
Email
-
WeChat
-
Verification Code
-
Message Content
-